¶ SentinelOne XDR Deployment Instructions
In the following article, you will find the instructions necessary to install Sentinel One XDR software to your servers and workstation endpoints.
While there are many ways to deploy software on-mass across a network, this article will detail only the Group Policy method commonly used in Active Directory deployments.
Note: For instructions using any 3rd party software deployment technologies, please contact us for further guidance.
¶ Exceptions for 3rd Party Anti-Virus Coexistance
If SentinelOne is to be deployed alongside existing anti-virus technologies to augment the existing capabilities in your enviroment, please first ensure the following exceptions are in place within your existing security products prior to installing SentinelOne to ensure the installation and ongoing functionality is unimpeded and avoid potential performance issues.
Please also ensure Secure-ISS is aware of any exceptions to be made on the SentinelOne side.
Exclude the following folders (including subdirectories) and the update file. You may need to adapt the paths to fit your products syntax.
\Device\HarddiskVolume*\Users\*\Documents\afterSentDocuments

\Device\HarddiskVolume*\Users\*\AppData\Local\afterSentDocuments

\Device\HarddiskVolume*\Program Files\SentinelOne

\Device\HarddiskVolume*\ProgramData\Sentinel

\Device\HarddiskVolume*\Documents and Settings\All Users\Application Data\Sentinel

\Device\HarddiskVolume*\Windows\Temp\SentinelInstaller.exe or SentinelInstaller_windows_vN_N_N_NN.exe (where N is replaced with the version number or wildcards)
¶ Considerations for Windows Security Centre (and Defender)
SentinelOne can be deployed alongside Windows Defender, the following section provides guidance on how to achieve this within your environment.
Default behaviour: By default upon installation of the SentinelOne agent, the Agent registers with Windows Security Center (WSC) as anti-virus protection. When SentinelOne is registered, Windows disables Windows Defender.
If you disable Windows Defender, Microsoft Exploit Guard and Credential Guard are not affected. We recommend you keep Microsoft Exploit Guard and Credential Guard enabled. They should not interfere with the SentinelOne Windows Agent.
SentinelOne supports a switch to stop such behaviour, allowing both components to run in parallel. This can be configured via an installation switch, a policy or on a agent by agent basis. Talk to our team about the most appropriate option for your current implementation.
Configure Windows Anti-Virus Registration:
Install the Agent for the first time with the command-line option.
Examples follow:
SentinelInstaller.msi /q SITE_TOKEN="string" WSC=false
SentinelInstaller-x64_windows_64bit_v1_1_1_111.exe /q /SITE_TOKEN="string" /WSCOFF
With the new EXE installer (Win 22.1+)
SentinelOneInstaller.exe -a "WSC=false"
For a group of endpoints or a Site, Secure-ISS can set the Policy Override. This makes sure that the setting is kept through future upgrades. This is SentinelOne’s Best Practice Recommendation. The setting is listed below for your reference, but we can set this on your behalf.
{
 "wscRegistration": false
}
There are a number of considerations in relation to Defender remaining enabled that should be considered and settings adjusted accordingly within a client environment:
- Ensure that Windows Defender is in Passive Mode
- Ensure that any scheduled full or partial scanning of files is minimal (if in Passive mode these should not be enabled). Due to the nature of these scans, they will also trigger SentinelOne to rescan the associated files causing a potential performane impact.
We recommend clients’ review the following publication from Microsoft in relation to Passive mode settings and limitations.
https://learn.microsoft.com/en-us/microsoft-365/security/defender-endpoint/microsoft-defender-antivirus-compatibility?view=o365-worldwide
¶ Network Share
In order to use Group Policy to deploy the Sentinel One software, you must have a network share that is readily accessible to all servers and workstations you wish to deploy to. If such a share does not exist, you will need to create one.
For the purposes of these instructions, it is assumed this has been done and the share location is:
Network Share: \\YOURSERVER\SentinelOneShare
¶ Installer File
You will have been provided with a Sentinel One XDR installer file and this msi file needs to be saved onto the share. The file is named SentinelInstaller.msi
To facilitate the automatic deployment of the Sentinel One software, we have prepared a batch file which will handle the installation without manual intervention. The details of the batch file are below:
@TITLE SentinelOne Installer
@ECHO OFF

SET MSI_LOCATION=\\YOURSERVER\SentinelOneShare
PUSHD %MSI_LOCATION%
SentinelInstaller.msi SITE_TOKEN="AsSuppliedBySecureISS" QUIET /NORESTART
POPD
To create the Batch file, copy the contents of the Window above and paste into Notepad. Then save the Notepad file as SentinelOneInstall.bat (ensureing that a valid SITE_TOKEN is used).
Copy this file to the same location on the Network Share as the Installer File.
Note: The batch file used here will install the software silently, that is, with no visible GUI. If you wish to see the GUI during install, remove the command “QUIET” from the batch file.
To install via PowerShell utilise the following script, replacing the two variables in the Configuration section with the MSI location and Site Token.
# Install SentinelOne via MSI
# v1.0 - 25/01/2022

# --== Configuration ==-- #
###########################
$S1_MSI = "\\YOURSERVER\SentinelOne.msi" # The source of the S1 MSI installer.
$SiteToken = "AsSuppliedBySecureISS" # Replace this with your site token - ask Secure-ISS for this.

# --== Initial Setup ==-- #
###########################
$Host.UI.RawUI.BackgroundColor = 'Black';
Clear-Host;

# --== Function Definition ==-- #
#################################
function Print-Middle( $Message, $Color = "White" )
{
    Write-Host ( " " * [System.Math]::Floor( ( [System.Console]::BufferWidth / 2 ) - ( $Message.Length / 2 ) ) ) -NoNewline;
    Write-Host -ForegroundColor $Color $Message;
}

# --== Script Start ==-- #
##########################

# Print Script Title
$Padding = ("=" * [System.Console]::BufferWidth);
Write-Host -ForegroundColor "Red" $Padding -NoNewline;
Print-Middle -Color "Red" "--== SentinelOne Installer ==--";
Print-Middle -Color "DarkRed" "PowerShell v$($PSVersionTable.PSVersion.Major).$($PSVersionTable.PSVersion.Minor)";
Write-Host -ForegroundColor "Red" $Padding;

Start-Process -FilePath $S1_MSI -ArgumentList "SITE_TOKEN=$($SiteToken)", "QUIET", "/NORESTART" -Wait;
¶ Creating Group Policy
Now that the Network Share and Batch File are completed, it is time to create the Group Policy.
Note: The Policy will be used to target settings in “Computer Configuration\Policies\Windows Settings\Scripts (Startup/Shutdown)
- Using a domain administrator account, you will need to log into a Domain Controller and navigate to Group Policy Management.
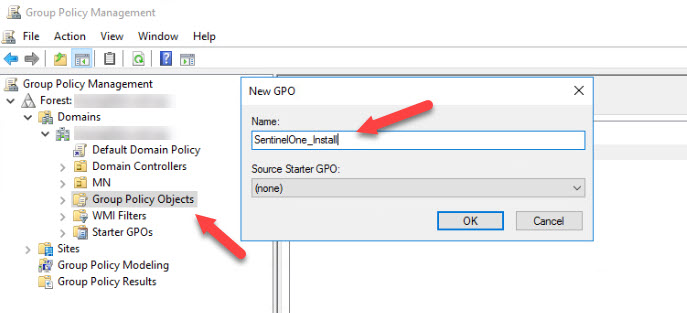
- Create the Policy by right-clicking on Group Policy Objects and selecting New. Name the New Policy SentinelOne_Install
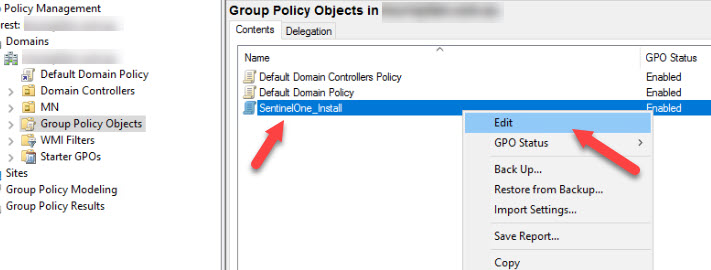
- Right click on the new GPO created and select Edit.
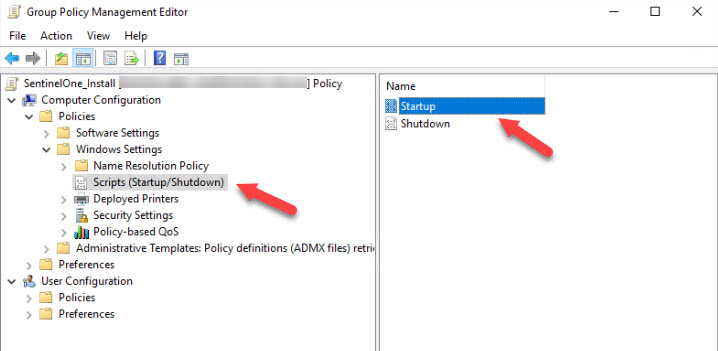
- Group Policy Management Editor will open allowing us to edit the GPO SentinelOne_Install. Go to Computer Configuration > Policies > Windows Settings > Scripts (Startup/Shutdown). On the right-panel, double-click on Startup.
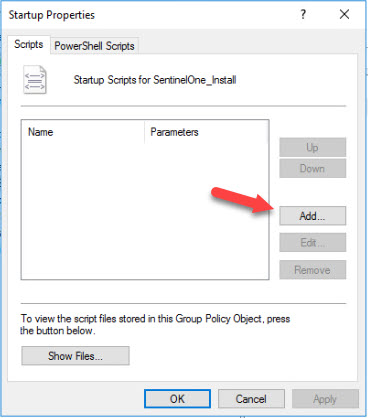
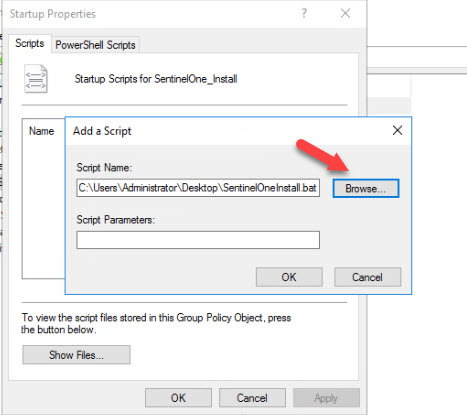
- In the Startup Properties Window, click the Add Button and then Browse to the Batch File you created prior. Click OK in the Add Script Window then OK in the Startup Properties Window then close the Group Policy Management Editor.
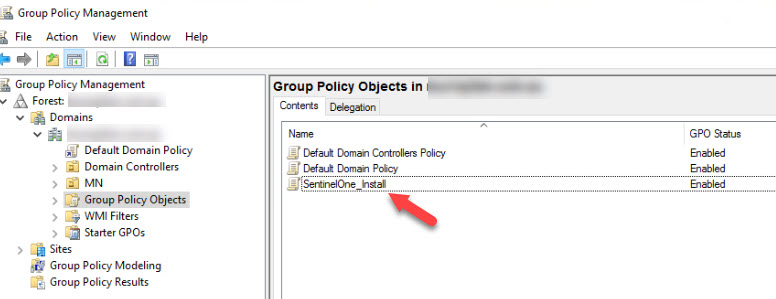
- The Policy has now been created and you should see it listed in the Group Policy Objects Window.
¶ Linking Group Policy
Currently the Group Policy exists but is not linked to any OU and will not do anything. To enable the Policy, it must be linked to an OU.
In the OU to which you wish to install Sentinel One, you must link the new Group Policy to the OU in which the target assets reside.
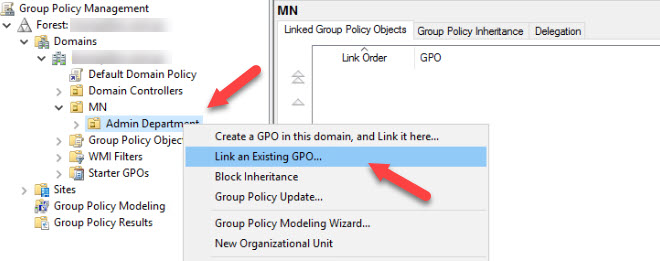
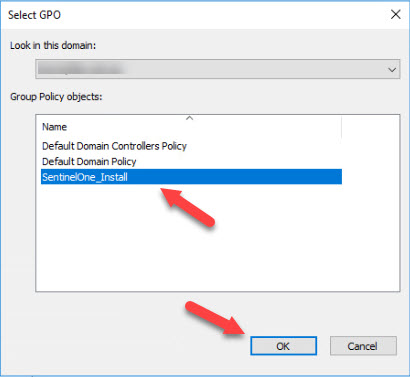
- Select the Target OU (in this example, Admin Department) and Right Click the OU, then select Link an Existing GPO. When prompted, click on the new SentinelOne_Install Policy and click OK.
- To ensure the Policy is applied in timely manner, you can force the policy to apply using a Group Policy Update.
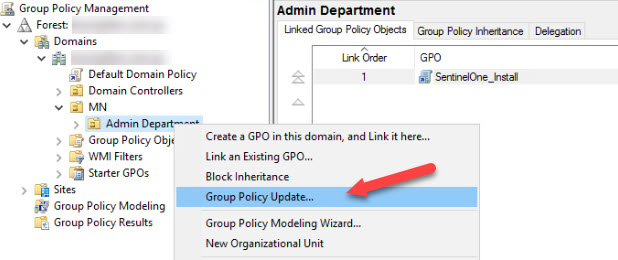
The assets in the OU will now have Sentinel One installed on their next startup.
Continue in this way until all assets in all OUs have the Sentinal One software installed.
¶ Installing on Linux Endpoints
¶ Linux Agent Deployment Configuration File
- Create a configuration file with the installation parameters, each on a separate line.
¶ Example
S1_AGENT_MANAGEMENT_PROXY=http://10.10.10.10:1111
S1_AGENT_DV_PROXY=http://192.0.2.0:1111
S1_AGENT_MANAGEMENT_TOKEN=eyJ1cmwiOiAiaHR0cHM6Ly91c2VhMS1zdXBwb3J0My5zZW5
S1_AGENT_AUTO_START=true
S1_AGENT_CUSTOMER_ID="Custom value here"
S1_AGENT_CREATE_USER=false
S1_AGENT_CUSTOM_INSTALL_PATH=/custom/install/path/
S1_AGENT_DEVICE_TYPE=server
¶ Example with subset
S1_AGENT_MANAGEMENT_TOKEN=eyJ1cmwiOiAiaHR0cHM6Ly91c2VhMS1zdXBwb3J0My5zZW5
S1_AGENT_AUTO_START=true
Note: There is a known limitation for Site Tokens (S1_AGENT_MANAGEMENT_TOKEN) that it cannot end in a equals sign ( = ) in the configuration file. Remove this character from the end of the token.
- Save the file and copy it to the Linux endpoint.
- Export one environment variable that defines the absolute path to the configuration file.
¶ Example
export S1_AGENT_INSTALL_CONFIG_PATH="/tmp/config.cfg"
- Install the package with the package manager.
-
RPM: rpm -i --nodigest package_pathname
-
DEB: dpkg -i package_pathname
Note for RPM: RPM installation requires the --nodigest switch. If you run the RPM command without the --nodigest switch, an error shows: Package SentinelAgent_linux_version does not verify: no digest.
¶ Example of the Linux Agent Configuration File usage:
[root@localhost ~]# rpm -i --nodigest /home/user/SentinelAgent_Linux_21_5_3_2_x86_64-release-v21.5.3.rpm
Setting registration token...
Registration token successfully set
Setting management device type...
Device type successfully set
Setting customer ID...
Customer ID successfully set
Starting agent...
Agent is running
¶ Linux Agent Install
- Download the package.
The Linux Agent uses standard Linux packaging formats: RPM and DEB.
-
RPM: CentOS, RHEL, Oracle, Amazon, SUSE, openSUSE, and Fedora.
-
DEB: Debian and Ubuntu.
-
Log in as a privileged user, or run the next command with
sudo. -
Run the installation command:
RPM
rpm -i --nodigest package_pathname
DEB
dpkg -i package_pathname
Installation usually requires less than one minute.